Quick Fixes: How to Repair Minor Scratches on Acrylic Stands
Acrylic stands have the advantage over glass stands as the clarity, and longevity of the acrylic enables it to be utilized in various ways not possible with glass. Be it as an exhibition of arts, marketing or memorabilia, they make a difference in how a product is presented. Acrylic stands can however get scratched as is the case with any other surface. Luckily, they can be fixed in a way easier than you may imagine. In this article, we will discuss how to deal with short-term solutions with regard to minor scratches on acrylic stands so that they appear like new.
Understanding Acrylic Stands
It is necessary to learn about the nature of material before proceeding to the techniques of repair. Plexiglass or Acrylic is a shatter resistant and lightweight plastic. It is also transparent hence a good alternative to glass because it gives a clear image of the products that it showcases. The acrylic stands also exist in a variety of shapes and sizes, a fact that makes the use of these stands attractive both in personal and business display.
With such a custom acrylic stand, it is important to keep them in shape so that they can provide the intended effect. Scratches can make them not that attractive, but using some simple repairs, you can take your acrylic stand back to the early days.
Common Causes of Scratches
Scratches on acrylic stands may happen due to a number of reasons:
- Mishaps: It can get scratched by bumping against the furniture or other items in the display.
- Dust and Dirt: Cleaning with an inappropriate cleaning stuff may cause micro-scratches.
- Improper Storage: Storing acrylic stands in a manner that causes rubbing against one another may cause scratches on them even after a long period of time.
Being aware of these causes can enable you to take precautionary acts and ensure your acrylic stands appear shiny.
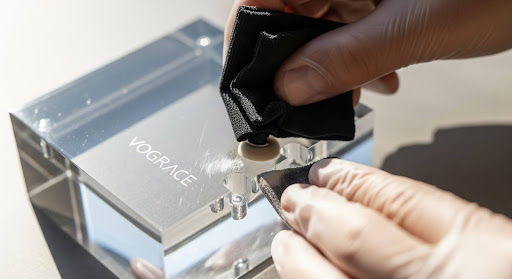
Quick Fixes for Minor Scratches
Since we have seen the possibility of scratches, we can now talk of the speedy fixes. All these are easy, inexpensive, and can be carried out at home.
1. Cleaning the Surface
It is imperative that you clean the scratched area before you even think of trying to make some repairs. A soft, lint-free cloth and a mild soap solution or acrylic safe cleaner should be used. It is imperative to not use ammonia-based cleaners, which can create extra damage.
- Steps:
- Combine a little warm water with a few drops of mild soap.
- Use the solution to wet a cloth, and then mildly rub it over the surface.
- Blot the place with a normal dry cloth.
2. Using Toothpaste
Toothpaste may also effectively act as an abrasive and help diminish the appearance of slight scratches. To provide the best results, please use a non-gel, non-whitening toothpaste.
Steps:
- Apply some little amount of the toothpaste to the scratch.
- Apply a soft cloth in a circular motion on the scratch and toothpaste.
- Clean off the residue tooth massage with a damp cloth and dry it.
3. Baking Soda Paste
Baking soda is also a household product that can be used to fix scratches to acrylic stands. It will also suffice because it is mildly abrasive.
Steps:
- Speaking of baking soda, mix two parts of baking soda with one part amount of water to form a paste.
- Apply the paste to the scraped area by using a soft cloth.
- Spread a small amount on the clean hand and rub lightly in circulating direction, and remove with a damp cloth.
4. Acrylic Scratch Remover
In case the scratches are more serious you may use a commercial acrylic scratch remover. Specific products are dedicated to work with acrylic surfaces, and their use can be quite good.
Steps:
- Apply scratch remover, in accordance with the manufacturer instructions.
- A soft cloth and the prescribed technique should be used in buffing the area.
- To provide a gloss appearance, rub Polish on a clean cloth.
5. Heat Treatment
In certain kinds of scratches, heating can aid the flattening of the surface. This is an ideal technique with shallow cuts.
Steps:
- Apply the heat gun or a hairdryer at a low level of power.
- Hold it a few inches away in front of the scratched area and move it back and forth.
- Watch out to avoid overheating the acrylic that may cause warping.
When to Seek Professional Help
Most superficial scratches can be fixed very simply at home, although some cases may demand intervention by professionals. If damages to your acrylic stand are drastic, encrusted, or the scratches go very deep, you may want to take it into custody of a professional.
Preventing Future Scratches
After repairing your acrylic stand, it is important to take measures to prevent scratches in the future. The following are some of the tips;
- Use non-abrasive cleaners: Clean with soft, lint-free wiping cloths.
- Storage Carefully: Store of acrylic stands in protective cases or padded up storage to prevent impacts.
- Avoid Aggressive Chemicals: Use cleaners that are made to work on acrylic only.
Conclusion
Minor scratches found in acrylic stands can be repaired easily to improve the appearance of its stands especially due to the ease of repairing the scratches. Toothpaste and baking soda, or even a purchase of a scratch remover will help you restore your acrylic stand back to its beauty. Proper acrylic stands maintenance and prevention care will make sure that your stands will impress not only now, but years further.
To learn more about custom acrylic stands and find many different options visit VOGRACE. Make your stands spotless and smile at the beauty of your acrylic stand!
Keep an eye for more latest news & updates on Buzz Discover!